Flex can not simply be acquired from the App Store and delivered to devices, there is a setup that needs to be completed and this must be done via your MDM.
Most Apps require the end user to configure the account to log into a server or perform an action. Flex is no different except it requires the administrator to configure the app. As you are the one holding the keys to your MDM server.
As the name suggests, Flex can be tailored to your needs. For example you can have the Flex app open and direct to the edit screen rather than the data review screen. So if you wanted end users to simply open the app, enter some data and save, this can be done.
Similarly you can also dictate which fields are visible and/or editable. This is critical as you only provide the fields that you want end users to see. Or you can also prevent editing all together, meaning you can present data to the end users as a kind of disclosure, useful in Europe if you need to disclose what data is collected.
One of key features of Flex is also the ability to display and/or edit Extension attributes, unlike previous apps that have done a similar process, Flex actually checks with the server to identify the field type and contents. If the field is a popup menu it will collect the values to present to the end user.
- Only Text from your MDM Server is visible, this can be in your preferred language, but text gathered from your MDM will be in the language visible to the API of the MDM.
- Edit Functionality can be revoked or delivered
- Fields can be selected to be displayed
- Erase or remote wipe of a device can be disabled
The user account your create for your Jamf Api User Credentials should have limited permission within your Jamf PRO Server. To achieve this we have put together a list of value you will need for your API User. Also is a link to another You Tube video describing the permissions in more details.
Jamf PRO Server Objects
- Buildings – Read Only
- Departments – Read Only
- Mobile Device Extension Attributes – Read Only
- Mobile Devices – Create, Read, Write
- Sites – Read Only
- Users – Create Read Update
Jamf PRO Server Actions
- Assign Users to Mobile Devices
- Send Inventory Requests to Mobile Devices
- Send Mobile Device Remote Wipe Command
The credentials must be stored within the App Configuration in order to allow the device to communicate with your MDM. Secondly these credentials must be in base64 and the associated account must have the credentials to read, modify or delete a device based on the inventory fields and access your wish to provide.
Essentially Obfuscating Credentials (making them harder to read)
Basic Credentials include a username and password, we take these and encode them for obfuscating credentials, in other words they are not uncrackable, just not rememberable.
Below we will help you to obfuscate the credentials into base 64 encoded format.
Option 1 – App for macOS or EXE for Windows
Option 2 – Scripted
Simply open the Terminal.app on your Mac and run the following script. You can Choose Python or Bash.
Python Script
#!/usr/bin/env python3
import base64

client_id = 'myapiuser'
client_secret = 'Pang@l@ct1cG@rgl3Bl@5t3r'
encodedData = base64.b64encode(bytes(f'{client_id}:{client_secret}', 'ISO-8859-1')).decode('ascii')
print(authorization_header_string)
Bash or Shell Script
#!/bin/bash

## Edit here with your Jamf PRo API user
client_id='myapiuser'
client_secret='Pang@l@ct1cG@rgl3Bl@5t3r'
# Do not edit below here
echo "Encoded String"
printf "$client_id:$client_secret" | iconv -t ISO-8859-1 | base64 -i -
Example 1 – Core Functionality
- Edit visible
- Erase or wipe Device enabled
- App Directed to Data View Screen
<dict>
	<key>serverURL</key>
	<string>$JPS_URL</string>
	<key>apiCredentials</key>
	<string>base64Credentials</string>
	<key>deviceID</key>
	<string>$JSSID</string>
	<key>submitText</key>
	<string>Submit</string>
	<key>forceDataEntry</key>
	<false/>
	<key>allowErase</key>
	<true/>
	<key>isEditable</key>
	<true/>
	<key>useLDAP</key>
	<false/>
	<key>enableAssetTag</key>
	<true/>
	<key>enableUsername</key>
	<true/>
	<key>enableFullname</key>
	<true/>
	<key>enableEmail</key>
	<true/>
	<key>enableDepartment</key>
	<true/>
	<key>enableBuilding</key>
	<true/>
	<key>enableSites</key>
	<true/>
	<key>labelUsername</key>
	<string>UserName:</string>
	<key>labelFullName</key>
	<string>Full Name:</string>
	<key>labelEmailAddress</key>
	<string>Email Address:</string>
	<key>labelSites</key>
	<string>Site:</string>
	<key>labelBuilding</key>
	<string>Building:</string>
	<key>labelDepartment</key>
	<string>Department:</string>
	<key>labelAssetTag</key>
	<string>Asset Tag:</string>
	<key>labelSerialNumber</key>
	<string>Serial Number:</string>
	<key>labelSupervised</key>
	<string>Supervised:</string>
	<key>labelIosVersion</key>
	<string>iOS Version:</string>
	<key>labelLastUpdate</key>
	<string>Last Update:</string>
	<key>labelSpaceUsed</key>
	<string>Space Used:</string>
	<key>labelImei</key>
	<string>IMEI Identifier:</string>
	<key>labelActivationLock</key>
	<string>Activation Lock:</string>
	<key>enabledEAs</key>
		<array/>
	<key>editableEAs</key>
		<array/>
</dict>
Example 2 – No Wipe and Change Default Display
- Edit visible
- Erase or wipe Device disabled
- App Directed to Data Entry Screen
<dict>
	<key>serverURL</key>
	<string>$JPS_URL</string>
	<key>apiCredentials</key>
	<string>base63Credentials</string>
	<key>deviceID</key>
	<string>$JSSID</string>
	<key>submitText</key>
	<string>Submit</string>
	<key>forceDataEntry</key>
	<true/>
	<key>allowErase</key>
	<false/>
	<key>isEditable</key>
	<true/>
	<key>useLDAP</key>
	<false/>
	<key>enableAssetTag</key>
	<true/>
	<key>enableUsername</key>
	<true/>
	<key>enableFullname</key>
	<true/>
	<key>enableEmail</key>
	<true/>
	<key>enableDepartment</key>
	<true/>
	<key>enableBuilding</key>
	<true/>
	<key>enableSites</key>
	<true/>
	<key>labelUsername</key>
	<string>UserName:</string>
	<key>labelFullName</key>
	<string>Full Name:</string>
	<key>labelEmailAddress</key>
	<string>Email Address:</string>
	<key>labelSites</key>
	<string>Site:</string>
	<key>labelBuilding</key>
	<string>Building:</string>
	<key>labelDepartment</key>
	<string>Department:</string>
	<key>labelAssetTag</key>
	<string>Asset Tag:</string>
	<key>labelSerialNumber</key>
	<string>Serial Number:</string>
	<key>labelSupervised</key>
	<string>Supervised:</string>
	<key>labelIosVersion</key>
	<string>iOS Version:</string>
	<key>labelLastUpdate</key>
	<string>Last Update:</string>
	<key>labelSpaceUsed</key>
	<string>Space Used:</string>
	<key>labelImei</key>
	<string>IMEI Identifier:</string>
	<key>labelActivationLock</key>
	<string>Activation Lock:</string>
	<key>enabledEAs</key>
	<array/>
	<key>editableEAs</key>
	<array/>
</dict>
Example 3 – No Edit
- Edit hidden
- Erase or wipe Device disabled
- App Directed to Data View Screen
<dict>
	<key>serverURL</key>
	<string>$JPS_URL</string>
	<key>apiCredentials</key>
	<string>base64Credentials</string>
	<key>deviceID</key>
	<string>$JSSID</string>
	<key>submitText</key>
	<string>Submit</string>
	<key>forceDataEntry</key>
	<false/>
	<key>allowErase</key>
	<false/>
	<key>isEditable</key>
	<false/>
	<key>useLDAP</key>
	<false/>
	<key>enableAssetTag</key>
	<true/>
	<key>enableUsername</key>
	<true/>
	<key>enableFullname</key>
	<true/>
	<key>enableEmail</key>
	<true/>
	<key>enableDepartment</key>
	<true/>
	<key>enableBuilding</key>
	<true/>
	<key>enableSites</key>
	<true/>
	<key>labelUsername</key>
	<string>UserName:</string>
	<key>labelFullName</key>
	<string>Full Name:</string>
	<key>labelEmailAddress</key>
	<string>Email Address:</string>
	<key>labelSites</key>
	<string>Site:</string>
	<key>labelBuilding</key>
	<string>Building:</string>
	<key>labelDepartment</key>
	<string>Department:</string>
	<key>labelAssetTag</key>
	<string>Asset Tag:</string>
	<key>labelSerialNumber</key>
	<string>Serial Number:</string>
	<key>labelSupervised</key>
	<string>Supervised:</string>
	<key>labelIosVersion</key>
	<string>iOS Version:</string>
	<key>labelLastUpdate</key>
	<string>Last Update:</string>
	<key>labelSpaceUsed</key>
	<string>Space Used:</string>
	<key>labelImei</key>
	<string>IMEI Identifier:</string>
	<key>labelActivationLock</key>
	<string>Activation Lock:</string>
	<key>enabledEAs</key>
	<array/>
	<key>editableEAs</key>
	<array/>
</dict>
Example 4 – Display Language (Korean)
- Edit enabled
- Erase or wipe Device enabled
- App Directed to Data View Screen
<dict>
	<key>serverURL</key>
	<string>$JPS_URL</string>
	<key>apiCredentials</key>
	<string>base64Encoded</string>
	<key>deviceID</key>
	<string>$JSSID</string>
	<key>submitText</key>
	<string>제출</string>
	<key>forceDataEntry</key>
	<true/>
	<key>allowErase</key>
	<true/>
	<key>isEditable</key>
	<true/>
	<key>useLDAP</key>
	<false/>
	<key>enableAssetTag</key>
	<true/>
	<key>enableUsername</key>
	<true/>
	<key>enableFullname</key>
	<true/>
	<key>enableEmail</key>
	<true/>
	<key>enableDepartment</key>
	<true/>
	<key>enableBuilding</key>
	<true/>
	<key>enableSites</key>
	<true/>
	<key>labelUsername</key>
	<string>사용자 이름:</string>
	<key>labelFullName</key>
	<string>전체 이름:</string>
	<key>labelEmailAddress</key>
	<string>이메일 주소:</string>
	<key>labelSite</key>
	<string>사이트:</string>
	<key>labelBuilding</key>
	<string>건물:</string>
	<key>labelDepartment</key>
	<string>부서:</string>
	<key>labelAssetTag</key>
	<string>자산 태그:</string>
	<key>labelSerialNumber</key>
	<string>일련 번호:</string>
	<key>labelSupervised</key>
	<string>감독 대상:</string>
	<key>labelIosVersion</key>
	<string>iOS 버전:</string>
	<key>labelLastUpdate</key>
	<string>최종 업데이트:</string>
	<key>labelSpaceUsed</key>
	<string>사용된 공간:</string>
	<key>labelImei</key>
	<string>IMEI 식별자:</string>
	<key>labelActivationLock</key>
	<string>활성화 잠금:</string>
	<key>enabledEAs</key>
	<array>
		<string>사용자 정의 자산 태그</string>
	</array>
	<key>editableEAs</key>
	<array>
		<string>사용자 정의 자산 태그</string>
	</array>
</dict>
Extension Attributes offer a huge flexibility option within the Flex ecosystem. Here you can add up to 4 Extension Attributes to allow end users to populate via a popup or standard text field to allow end users to populate information manually.
Example:
- Field Name in Jamf: “Aircraft_Type”
- Field Name in Jamf: “Department OG”
- Field Name in Jamf: “Reason for Return”
To enter these details into the app configuration web form please use the name from the Jamf Extension attribute as the Title and configure its edit-ability via the radio buttons. An example of the code is below;
<key>enabledEAs</key>
<array>
    <string>Aircraft_Type</string>
    <string>Department OG</string>
    <string>On Loan Device</string>
    <string>Reason for Return</string>
</array>
<key>editableEAs</key>
<array>
	<string>Aircraft_Type</string>
	<string>Department OG</string>
	<string>On Loan Device</string>
	<string>Reason for Return</string>
</array>
Example Full App Config with Extension Attributes
<dict>
	<key>serverURL</key>
	<string>$JPS_URL</string>
	<key>apiCredentials</key>
	<string>base64Credentials</string>
	<key>deviceID</key>
	<string>$JSSID</string>
	<key>submitText</key>
	<string>Submit</string>
	<key>forceDataEntry</key>
	<false/>
	<key>allowErase</key>
	<true/>
	<key>isEditable</key>
	<true/>
	<key>useLDAP</key>
	<false/>
	<key>enableAssetTag</key>
	<true/>
	<key>enableUsername</key>
	<true/>
	<key>enableFullname</key>
	<true/>
	<key>enableEmail</key>
	<true/>
	<key>enableDepartment</key>
	<true/>
	<key>enableBuilding</key>
	<true/>
	<key>enableSites</key>
	<true/>
	<key>labelUsername</key>
	<string>UserName:</string>
	<key>labelFullName</key>
	<string>Full Name:</string>
	<key>labelEmailAddress</key>
	<string>Email Address:</string>
	<key>labelSites</key>
	<string>Site:</string>
	<key>labelBuilding</key>
	<string>Building:</string>
	<key>labelDepartment</key>
	<string>Department:</string>
	<key>labelAssetTag</key>
	<string>Asset Tag:</string>
	<key>labelSerialNumber</key>
	<string>Serial Number:</string>
	<key>labelSupervised</key>
	<string>Supervised:</string>
	<key>labelIosVersion</key>
	<string>iOS Version:</string>
	<key>labelLastUpdate</key>
	<string>Last Update:</string>
	<key>labelSpaceUsed</key>
	<string>Space Used:</string>
	<key>labelImei</key>
	<string>IMEI Identifier:</string>
	<key>labelActivationLock</key>
	<string>Activation Lock:</string>
	<key>enabledEAs</key>
	<array>
		<string>Aircraft_Type</string>
		<string>Department OG</string>
		<string>On Loan Device</string>
		<string>Reason for Return</string>
	</array>
	<key>editableEAs</key>
	<array>
		<string>Aircraft_Type</string>
		<string>Department OG</string>
		<string>On Loan Device</string>
		<string>Reason for Return</string>
	</array>
</dict>
Designed for the company or organisation that wants to use Flex and force users to enter their data.
Imagine your site needs to deploy mail settings and custom lock screen message. We need their username, email address and possibly which department and building they are in.
The end result of this demo is to
have an automated solution to ensure end users enter their data. If they do not, then the iPad or iPhone remains locked to Flex, waiting for the data to be entered… forever! Who said the days of evil IT admins were over?
If you want the Flex app to ‘first’ launch directly to the edit interface on the initial launch then this option is for you.
Step 1 Smart Group – group our target audience
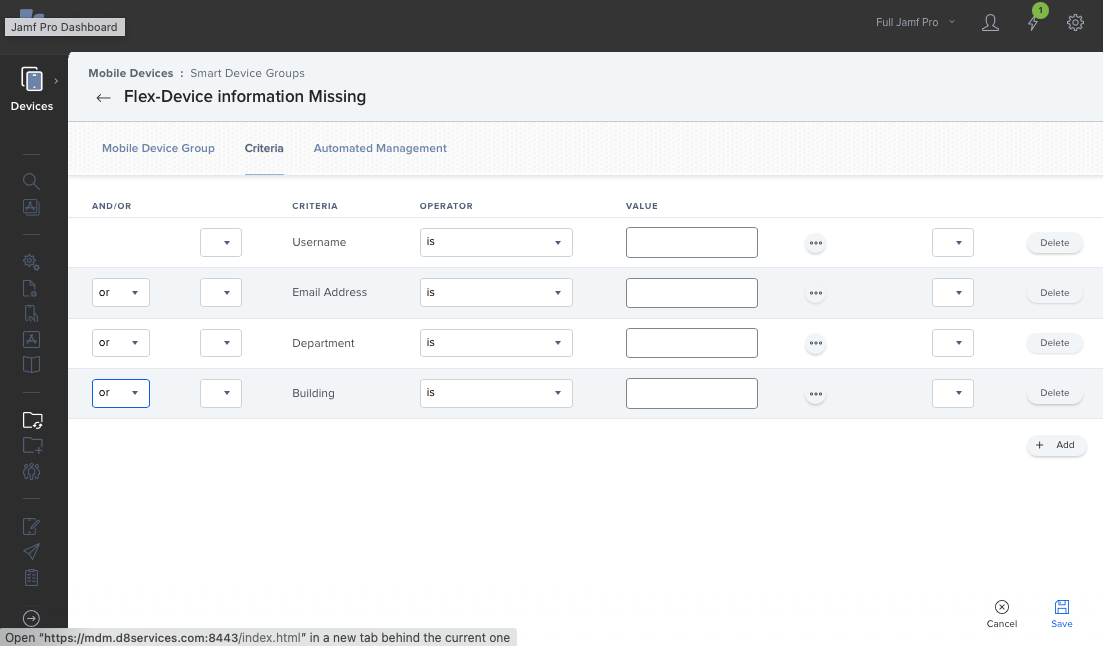
Lets start with a smart group to identify the devices. And lets say our company name in the example below is D8Flex, obviously you will change this on your site.
Smart Group Name
Flex-Device information Missing
Criteria
If we enter “blank” below then do not enter anything for the value, when in doubt have a look at our screen shot below. Think of a smart group as an automated search by Jamf.
Modifier
or
or
or
Criteria
Username
Email Address
Department
Building
Operator
is
is
is
is
Value
blank
blank
blank
blank
Step 2 Lock the device to Flex
Configuration Profile (before data entered)
So once we have the smart group created and we have confirmed its correct operation (please always check your smart groups are correct), i.e. edit the user details to see if the smartgroup responds correctly once you enter some information.
Navigate to:
Jamf Dashboard > Mobile Devices > Configuration Profiles
Next we want to lock the device to the Flex app. So for devices with missing information we deploy a configuration profile to only allow Flex.
Name
auto – Device info missing
Payload
Single App Mode App Name: FlexMDM
Scope
Flex-Device information Missing
bundle identifier is com.d8services.flexSo far we have created one smart group and one configuration profile. The result on the device is that at any time the user information is removed the profile to apply “Single App Mode” is re-applied.
If the device is to remain on a shelf until it is assigned it can be powered down. The next user who received the device then submits their details and once complete single app mode will be disabled.
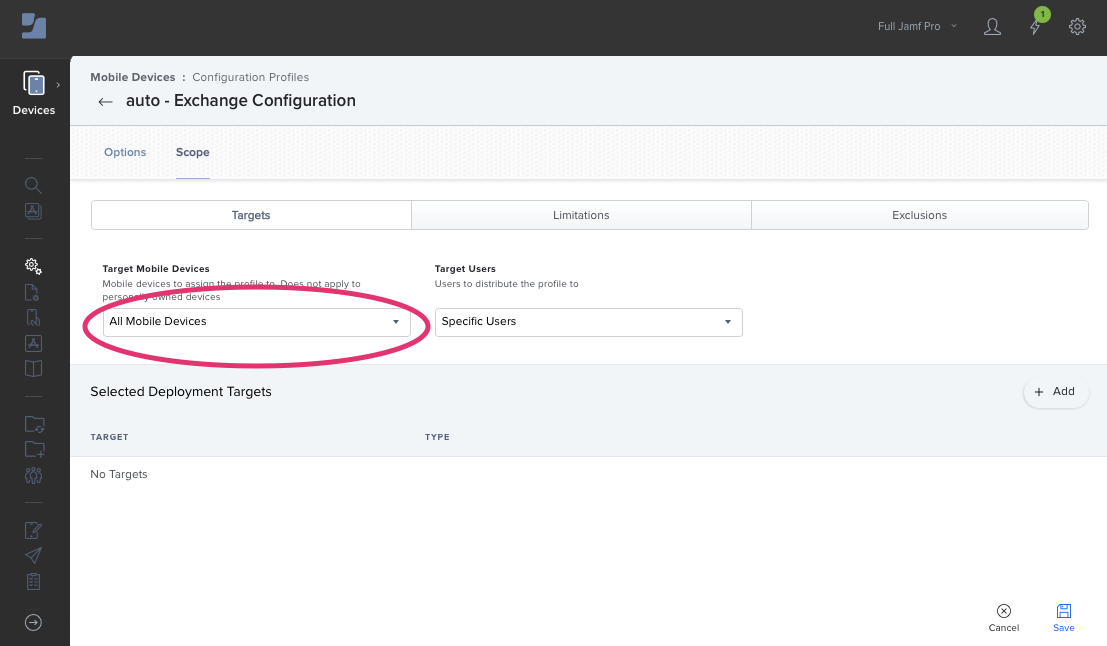
Step 3 Data Entered – what now?
I’m glad you asked, well now we have our devices with all the information we want or need, so now we will simply deploy our configurations. Targeting All devices while excluding the smart group we created earlier. In the scope pane of a configuration profile you will see three tabs across the top of the screen. The first is the target, i.e. the main body of devices you want to deploy to, the second is the limitation of the target group, and lastly there is the exclusion group. As we created a smart group for information missing, we can simply add that group here.
Name
auto – Exchange Configuration
Payload
Exchange ActiveSync
Scope
Target: All devices
Limitation: none
Exclusion: Flex-Device information Missing
Payload Value
Account Name: D8Flex
Exchange ActiveSync Host: outlook.office365.com
Domain: blank
User: $EMAIL
Email Address: $EMAIL
Password: blank


Step 4 Lock Screen details
Lock Screen Message and gocha’s
Now you might ask why we need a discussion on this, but the lock screen is only deployed when either we manually modify the Configuration Profile and re-push this to “All Devices”, or when you fall in and out of the scope, maybe via smart group (I’m glad we created one earlier, arn’t you?).
So if you deploy a lockscreen screen payload to the device before all user data is available, then the Jamf server sends out a configuration profile without any user information included. It will not resend if the user data is updated, either manually or via Jamf, it must be resent to the device one information is present.
Now this said you could choose to simply contain Building or Department information and nothing about the end user. If this is the case simply assign it to the Building or Department. If you assign a configuration profile to the scope of a Building and Department then the profile might be installed when only one is set, meaning the result in the “LockScreen” will simply display the variable name i.e. $DEPARTMENTNAME instead of the actual department name. To correct this you will have to redeploy the profile. A way around this is to make a smart group for the Building and Department, then scope to this, ensuring both are set prior to assignment.
Name
auto – Notification Screen
Payload
Lock Screen Message
Scope
Target: All Devices
Limitations: none
Exclusions: Flex-Device information Missing
Payload Value
Asset Tag Information: | $EMAIL | D8Flex | $DEPARTMENTNAME | $BUILDINGNAME |

I realise that the Asset Tag Information payload above might appear a bit odd looking, but the end result we want is as follows:
| [email protected] | D8Flex | Development | Bangkok Soi 105 |
A quick screen shot from the device after deployment is below. When a configuration profile contains variables it means we do not need multiple profiles for each device. One will surfice, but Jamf populates this variable with the device information at the time of deployment. So each device receives its very own profile.

For more variables you can use with Jamf configuration profiles please have a look at Jamf’s Administrator Guide
serverURL
this “should be set to $JPS_URL, this is the URL to connect to your Jamf PRO Server, by using the Jamf variable the URL is submitted by Jamf during deployment
string
apiCredentials
Credentials for the Jamf Pro service account you will be using with Flex, we have created both an App and demonstrated the raw code for you to choose. see under credentials on this page https://flex.d8services.com/flex-app-config-examples/
string
deviceID
device ID with in your Jamf PRO Server, this value must be set to the Jamf variable $JSSID. If you enter a value manually here flex will show you another devices inventory record. DO NOT CHANGE THIS
string
frontPageGraphic
Currently not in use, but if we receive feedback we can start work on this. It is the URL for the graphic you may want to have as the loading screen
string
submitText
Text used by Flex to display the submission button after editing, allows for folk from other countries to use their language. Flex will default to “Submit” if this value does not exist, but you could have “enter”, or whatever you like.
string
forceDataEntry
optional to force Flex to the edit screen on initial launch.
Boolean true/false
isEditable
Does Flex allow the end user to edit the user data? If you disable this then you could simply use Flex for showing your users their “collected” data on your server. And also allow end users to update inventory etc.
Boolean true/false
enableAssetTag
Will the Asset Tag field visible in both the edit and display only pane.
Boolean true/false
enableUsername
Will the username field visible in both the edit and display only pane.
Boolean true/false
enableFullname
Will the Full Name field visible in both the edit and display only pane.
Boolean true/false
enableEmail
Will the Email field visible in both the edit and display only pane.
Boolean true/false
enableDepartment
Will the Department field visible in both the edit and display only pane.
Boolean true/false
enableBuilding
Will the Building field visible in both the edit and display only pane.
Boolean true/false
enableSites
Will the Sites field visible in both the edit and display only pane.
Boolean true/false
labelUsername
Text used to describe the Username field, also can be another language, based on your preference
string
labelSites
Text used to describe the sites from Jamf PRO, also can be another language, based on your preference
string
labelBuilding
Text used to describe the Building field, also can be another language, based on your preference
string
labelDepartment
Text used to describe the Department field, also can be another language, based on your preference
string
allowErase
Will Flex allow end users to wipe their device? The erase option will be greyed out if false
Boolean true/false
enabledEAs
Extension Attribute names allowed for viewing (enter these in your language in Jamf, and then enter the same string of characters in this field) upto 4 individual EA’s are allowed
Array of strings
editableEAs
Extension Attribute names used in the edit screen (enter these in your language in Jamf, and then enter the same string of characters in this field) upto 4 individual EA’s are allowed
Array of strings